Panzer Battles Tarawa scenarios free for download

Merry Christmas! These new scenarios are for the readers of this blog who own the free, Panzer Battles Demo. If you do not own the demo, but want to try this scenario, please download the demo from JTS/WDS here.
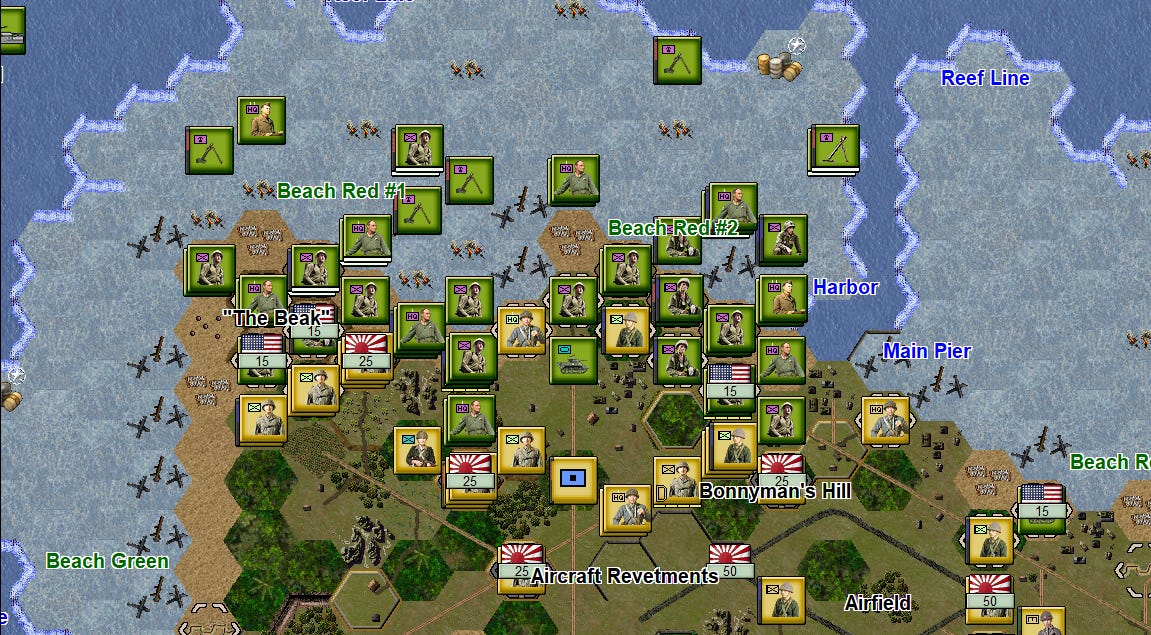
My first Tarawa scenario is called “Operation Galvanic - The First Day.” It is 18 turns long, and pits 3,000+ men of the US 2nd Marine Division against approximately 2,500 Japanese defenders of the 3rd Special Base Force and the 7th Sasebo Special Naval Landing Force (SNLF).
My second Tarawa scenario is called “Operation Galvanic - The First Day - Variable Points” It is 18 turns long, and pits 3,000+ men of the US 2nd Marine Division against approximately 2,500 Japanese defenders of the 3rd Special Base Force and the 7th Sasebo Special Naval Landing Force (SNLF). It uses a variable point scoring system for a handful of objectives, which forces the American side player to be more aggressive along the edge of the island and/or seize one of the airfield objectives on the first day. I found this version of Operation Galvanic far more challenging.
This is NOT a full representation of the forces present during the actual battle for Betio island. For the sake of time, and counter density, I have only modeled the troops that fought during the first day, mainly the 2nd and 8th Marine Regiments. I have not included the follow-on forces for the Americans that figure into the battle on the evening of November 20th and subsequent days.
I am not an expert on Tarawa, the SNLF, the Marines or the war in the Pacific. If you are, please forgive my omissions, mistakes, etc.
My scenario notes are as follows:
Japanese units created
Rear Adm. Keiji Shibazaki (HQ unit). He is killed on the first day but directs the initial defense of the island.
120mm CD Gun (f): These large coastal defense guns engaged the US Navy until they were knocked out. Beware of them, they can sink an LCT and disrupted one of my USN destroyers in my last play-through.
80mm Mortar: These were present in abundance and I have added them into the Japanese OOB.
Otherwise, I have relied upon the existing Guadalcanal units included within the demo for the Alligator Beach scenario.
American units “created”
11 historical American commanders (HQ units): Shoup, Schoettel, Rice, Amey Jr., etc. are present.
Fletcher Class DD: These were present in the Battles of Normandy game and I ported them into the Demo database for this game.
Colorado Class BB: These were present in the Battles of Normandy game and I ported them into the Demo database for this game.
LCT: These were present in the Battles of Normandy game and I ported them into the Demo database for this game.
LCT(R): These were present in the Battles of Normandy game and I ported them into the Demo database for this game. These are single-use units that disappear after turn 1 so make sure you use them.
Otherwise, I have relied upon the existing Guadalcanal units included within the demo for the Alligator Beach scenario.
Additionally, I have the following comments:
- Visibility during the battle was awful. Smoke from the naval bombardment obscured much of what was going on and led to numerous problems with the prosecution of the battle. Consequently, I have decreased visibility.
- The first wave is ashore or almost so at the start of the scenario. I did this to make the start more historical (some of you might land on the southern side instead of the northern side) and because I wanted to save you counter management time. You will see how tedious bringing waves of LCTs into the beachhead can become when the 1st Bn, 2nd Marines is released from the reserve.
- The planners of Operation Galvanic ignored local knowledge of the tides and so when the first waves approached the island, they hit the exposed, coral reef line and shallow water. Many LVT drivers dumped off their cargo up to as many as 1,000 meters away from the shoreline. And so very few LVT’s made it to the beachhead due to the reef and/or enemy fire. If you look closely at the map, you will see the LVT wrecks. Subsequent waves of reinforcements came in on LCTs due to the heavy LVT losses. That is why I did not include LVT’s in this scenario. Presumably, most are destroyed by 9:30 AM when the scenario starts and I didn’t want to take the time to chase down art for the various sized images I would need.
- I did not model air assets (recon, fighters or otherwise). I didn’t see Avengers and Hellcats in the Normandy asset list and skipped over recreating them.
- You will see intel on estimated Japanese artillery positions on the map from an overhead naval recon flight before the first wave hit. Take these guns out or they will sink ships.
- I did not identify American officers below the rank of Battalion commander. I did include two XO’s who figure prominently in the battle on the first day.
- You will see disruption, losses, and fatigue built into both forces when the scenario starts. Japanese forces are disorganized/reduced from the extensive naval bombardment and American forces disorganized/reduced from the effort to get ashore during the opening moments of the battle.
- This map is not to scale. Betio island is incredibly small. Something like 300 acres in total. The PB scale is 250 meters per hex. Because I did not know how to change the scale to something like 100 meters per hex, I just enlarged the map. It is roughly 2-2.5x the actual size island at this scale.
- The OOBs are not perfect. They are approximations and nothing more. JTS/WDS and would put SO MUCH MORE effort into historical accuracy than I did. So if you find points to quibble within my OOB, you wouldn’t if they had done it. For instance, I used the existing Stuart tanks in the American OOB instead of Sherman tanks. I did not include the handful of Japanese tanks present on the island. They make only a few mentions in the histories of the landing and it seems most were wiped out by the initial naval bombardment.
- I have tried something new. American commanders and official histories recount how the fire intensified over the course of hours, which to me was counter-intuitive because you would think there were fewer defenders. But when you think about it, the Japanese defenders likely faced terrible command and control issues due to the bombardment. Radios were knocked out, their commanding officer Shibazaki was killed late on the first day and many defenders were holed up in tunnels below the ground, waiting out the destruction overhead without orders. It would take time for the defense to organize in these conditions and so consequently, American players will likely notice more and more Japanese counters appearing on the map as the battle progresses through the initial hours as they arrive by a reinforcement schedule.
TO DOWNLOAD THIS SCENARIO GO TO MY DROPBOX HERE.
Replace the data editor with the new copy.
Replace the existing Japanese and American-Marine folders with the new copies. Add the data and scenarios to the existing folders within the demo.
IF you are not a subscriber to my blog’s email list, I encourage you to add yourself here for follow-on scenarios set in the Pacific (Guadalcanal, Burma and Cape Gloucester).
SPECIAL NOTE: A special note of thanks to David Freer at WDS who helped me with some image issues, the map editor and who suggested creating the variable points version scenario.


Comments
I sided with including them. Given the extensive naval bombardment of Betio, it may be that these guns were thoroughly destroyed prior to USMC landings.