Re-fighting the Battle of Vimeiro
Wellington’s positioning was as good as Waterloo and Bussaco.

I’ve redesigned this battle many times using the core scenarios from the John Tiller game “Bonaparte’s Peninsular War.” This time though, I’ve updated the map, decreased the size of the map and focused on Wellington’s positioning by relying upon the first-hand accounts of the battle rather than the JTS original setup.
I’ve concluded that even if GD Jean Junot had attacked in a unified fashion against Wellington (instead of the piecemeal fashion that he did), Wellington would have held his ground with the three brigades he had in and around Vimeiro: Fane, Ferguson and Anstruther (with Acland’s as a late reinforcement); against the entire French Army of Portugal.
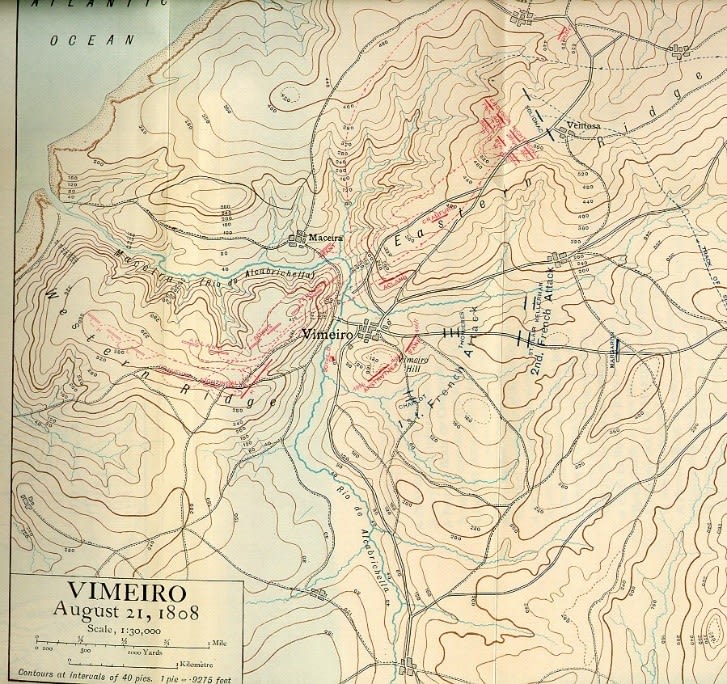
Redesigning the Map

Above is the new battlefield map. I’ve focused on Vimeiro and the eastern approach that Junot took and I did not include Ventosa Farm and the upper valley that Solignac and Brenier’s brigades blundered into.
I’ve added elevation figures on the prominent hills, added farmers’ fields, reduced the forest hexes that were on the original map, and added in labels for Vimeiro Hill and the Church which figured into the battle.
This image is the battlefield today, which hasn’t changed all that much and was very helpful to designing the map:

I grabbed this image and the first-hand accounts below from the Napoleon-series website, which has much more detail about the battle.
Re-fighting Vimeiro
I’ve created three scenarios:
1) Vimeiro - The First French Attack: The historical scenario featuring four different attacks against Vimeiro. 16 turns length. No reinforcements for either side.
2) Vimeiro - Full French Attack: This fictional scenario includes the historical starting positions, but only two attacks against Vimeiro by the regular French infantry and then the combined reserve infantry (converged grenadiers). 16 turns length. No reinforcements for either side.
3) Vimeiro - Full French Attack – Army of Portugal: This fictional scenario includes Junot’s full army (Brenier’s and Solignac’s brigades are a part of the combined attack). Both French infantry divisions + the Reserve division attack at the same time and the cavalry division is committed later in the scenario. 16 turns length. British off-map reinforcements include Acland’s brigade because they historically protected the left flank of the British positions in Vimeiro.
Victory conditions: I’ve eliminated victory points for killing enemy soldiers (these can sometimes wildly skew results in JTS games). Victory points are instead assigned for securing objectives: 100 points for securing the center of Vimeiro proper and 25 points for securing the crossing over the Rio de Alcidrichella.
Wellington’s tactics at Vimeiro
Wellington is known for his use of reverse slope positioning at Waterloo. His mastery of understanding the battlefield also extended to the Peninsular battles of Talavera and Vimeiro among others. He often encouraged his troops to lie down to protect them from withering enemy fire (at Talavera on Cerro de Medellin for example) and he liked to position men in battlefield lowlands, hidden from the enemy line of sight (see below). He did both things at Vimeiro.
First-hand accounts of Vimeiro, mention concealment:
A Scottish soldier in the 71st Foot, which was part of Ferguson's Brigade, wrote of the fighting:
"We marched out two miles to meet the enemy, formed line and lay under cover of a hill for about an hour, until they came to us. We gave them one volley and three cheers — three distinct cheers. Then all was as still as death.
General Anstruther who commanded one of the brigades on Vimeiro hill:
"Ordered the 97th, who were concealed behind a dip of the ground, to rise and fire; after two or three rounds they (the 97th) began to advance from the position,”
Choosing the ground to meet Junot:
Reconnoitering ahead of his army, Wellington chose a good piece of real estate for a battle. Vimeiro is on the eastern side of the Rio de Alcidrichella. It is protected on either flank by streams and a hill (160 feet of elevation) that protects the southern and eastern approaches to the village. Overshadowing the village on the western side of the Alcidrichella is “Hill 280” which towers over Vimeiro Hill with an additional 120 feet of elevation. Wellington placed two brigades on Hill 280 initially, Ferguson and Bowes along with supporting artillery.
The eastern approach, which Junot historically used to attack the village was blocked by Fane’s excellent light brigade, and a battery of guns. Anstruther’s 7th brigade was ordered to lie hidden beneath Vimeiro hill to the south in a lowland out of sight, protecting Fane’s right flank.
I’ve wondered before if Wellington could have held this ground against the entire French army with these troops. His unit quality was higher, his artillery was well-placed and the terrain he chose minimized the danger from the larger force of French cavalry. French unit quality was also very poor in the Peninsular in 1808.
RELATED READING: “The 1805 Army Is Dead”

Fighting the whole French Army:
To create the final versions of these scenarios, I’ve probably played some combination of them two dozen times. In my final play-through, I took on the full Army of Portugal. The French AI attacked in concert, coming against the British lines multiple times before finally faltering (see below).

Historically, the Allies (Brits and Portuguese (not part of these scenarios) suffered 720 killed, wounded and missing. The French suffered 2,160 killed, wounded and missing. In comparison to the historical result, it is exact on the Allies side, and more devastating to the French.
Final positions:


Comments